Saturday, August 31, 2019
...And Another.
My second Black Skaven is now finished. I gave this one a naginata, which will simply count as a spear in Mordheim. As with the other Black Skaven, I decided to make his cowl green to give a bit of color to my black-clad Eshins, as well as to give something to differentiate them from my Adept and Night Runners (which I have yet to make). Green is also the color of my Skaven army, so if I ever manage to actually finish it, this will help to tie my Gutter Runners into the rest of the army.
The base for this model was the Festering Skaven from Spiteclaw's Swarm. This one has the most dramatic pose by far, so I really wanted to make use of him (and I'm tempted to think of a way to use him again). I like that they actually modeled another character using tail-fighting skills, but I thought that the dagger as well as the end of his tail were a bit thin and flimsy looking, especially in contrast to Snikch's tail, which looks thick and muscular and is wrapped around his blade several times. By comparison, the Festering Skaven's blade looks like it's tied to a thin piece of string and floating gently in the air. So as much as I like the idea of a tail weapon, I decided to remove it from this model. Maybe I'll try to make my own later.
Like my Assassin Adept, I used a Myrmourn Banshee to make his long, tattered cape. Since his arm is sweeping out to the side with his naginata, I wanted his cape to look like it had been tossed across to his other shoulder, hence using the smaller, thicker banshee bit.
As usual, I tried to add some Mordheim imagery to the model, such as keys...
...and skulls.
Again, I didn't want my Gutter Runners to be quite as pale as my Adept, so this guy got a slightly darker, healthier skin tone. I ended up adding a lot of very pale highlights in the end, but I think the final result turned out rather well.
I've now only got two more heroes to go, though I'll still have to make a huge pile of Verminkin for this to actually be a playable warband. Still, quite pleased with the first little bit.
Sunday, August 25, 2019
More Ninja Rats
The next member of my little band of Skaven Ninjas is finally finished. Since the background fluff for Clan Eshin is that they learned to be sneaky assassins by watching actual human ninjas, I wanted my Mordheim warband to actually use as many traditional Japanese, Chinese, and Indian weapons as possible, instead of the mostly European weapons that come in the kits. So here is the first of my two Black Skaven, armed with a Kusarigama, which will count as a sword and buckler. Conveniently, the rules for sword and buckler in Mordheim are actually quite well suited to a Kusarigama, as the double parry is a pretty good way of representing the use of the chain to distract and entangle your opponent.
In keeping with my theme of pinning ridiculously tiny bits together, I decided that I needed to pin the blade of the kama onto the handle, just in case. I don't think it was quite as bad as trying to pin the Horror arms, but the bit I was pinning was so small that you can actually see the pin through the thin layer of plastic that was left after I drilled it out.
The body of this guy is actually from one of the original plastic Night Runners that came in the Mordheim box. I liked the little row of throwing stars on the bandolier across his chest and by sticking the Night Runner body on the newer Clanrat legs, it gave him a bit more of an upright posture, which I wanted for his pose of raising the kama above his head.
The chain was definitely the most difficult part of this conversion. I wanted to make it as solid and stable as possible, which I sort of achieved. The chain is cobbled together from a number of different lengths of chain, mostly from Dark Eldar bits, as I recall. The main chain going from the handle to his left hand is made up of at least two shorter lengths of chain, but I have it kind of tucked below his head, so that it's hopefully not in a position where it could get caught on something or that the model could fall and land on this bit. The last little bit of chain with the weight is a bit more flimsy, and I definitely broke it off a few times and had to re-glue it to the model. In retrospect, I probably should have tried to find a longer bit of chain that would have allowed me to rest it on the ground, but if it breaks off in the middle of a game, I may end up doing that anyway.
The cape comes from one of the Blood Bowl Skaven models, though I hacked at it a bit to make it look a bit more distressed, though this fellow definitely has one of the better kept capes in the warband.
I made some cobblestones from green stuff to try and match the basing on the other models...
...and of course, the obligatory skull.
I also just realized that it's now been slightly over a year since I started working on this guy, which is kind of sad, but at least that's a marked improvement from the twelve years it took me to finally finish my Sorcerer.
Hopefully the rest of the warband will be coming along soon!
Wednesday, July 3, 2019
Skaven Assassin Adept
Here's the leader of my Eshin Warband, my Assassin Adept. Clan Eshin has always been a bit lacking in models, and since I was never a huge fan of the old metal Gutter Runners, I was pretty much stuck with just the Night Runner sprues that came in the Mordheim box for building all the characters in the warband (though to be fair, they were probably the most versatile models in the range at the time). Although I like the new Skaven plastics much better than the old, huge-fisted 90s models, none of the Eshin models have been updated, so they look even more out of place now. Fortunately, a couple of the models that were released with Spiteclaw's Swarm look very Eshiny with a few tweaks.
I know some people who do a lot of converting aren't a fan of the new snap-fit easy-to-build models, but I actually really like them for conversion work. It's true that you end up with a lot of weird pieces, like a head and an arm, or a partial torso, so simple head swaps are usually out of the question, but since I usually end up having to chop things apart and pin them to make them fit anyway, it's not a big deal to me. Plus, even with pieces sawed off, the models do still usually fit together so tightly that I probably could get away with not gluing them.
As you probably guessed, I used the Lurking Skaven as the base for my Adept. I had a pair of old 90s fighting claws that I've been saving for this conversion, but since he already came armed with a pair, I didn't have to do anything to his weapons.
I often used the capes from the Night Runners sprue to differentiate characters or Gutter Runners from the rank-and-file Night Runners, though they never really looked that great. They were a bit square and tended to stick straight out like someone had used too much starch on them. I experimented a lot with green stuff capes, but even using some wires for support, they were always a bit too flexible when they weren't draped over the hard plastic body and I could never quite get the sort of flowy shapes that I wanted for a character that's leaping forward like this. I needed to use something that was rigid and had plenty of detail.
In the end, I went with the lower half of a Myrmourn Banshee, another excellent snap-fit kit. The only downside is that the part that attaches to the torso is pretty thick, so I had to file it down until it was a shape that would fit over my Adept's shoulders. I also bent the cape a bit using a heat gun so that it didn't stick straight up and make the model like five inches tall.
I found a plastic clanrat sporting a cowl and sawed off his head to replace the more armored one from the Lurking Skaven. I then connected the cape to the hood with some green stuff. I also added some keys to his belt, because everyone in Mordheim carries keys. I probably should have also had him carrying a fish, some candles, and a marionette or two, but I guess I'll have to save those for some other models.
I tried to give him a more pale, sickly skin tone than my other Skaven, as well as kind of a grimy look to show that he'd been lurking around the ruins of Mordheim for quite a bit longer than most of the members of the warband. In general I think it worked pretty well, though the contrast between the pale highlights and the dark grime that settled more in the recesses might make the shadows look a bit stark. Still, he turned out pretty well, and much better than anything that I could have managed a few years ago before the Warhammer Underworlds and Nighthaunt models came out. Now Games-Workshop just needs to release some actual Eshin models and we'll see what I can really do.
Friday, June 28, 2019
Mordheim Eshin Sorcerer
Since my Morker mob is finally finished, I decided to switch gears into Mordheim. First up is my Eshin Sorcerer. This conversion has actually been a long time in the making. His arms are from the old metal Horrors of Tzeentch. I bought them from Games-Workshop back when you could still buy bitz directly from their website, which would mean that I started working on this guy back in...2007? I don't think it was the initial inspiration for this conversion, but it was certainly influenced along the way by Nordic's Eshin Sorcerer from his old DeviantArt account. As I recall, my original plan was to use a Plague Monk body, but I'm glad that I decided to go with the Empire Wizard instead.
I had to carefully cut and pin the Horror arms to get them to fit properly with the Wizard bitz that I was using for the body. This ended up being ridiculously hard, as the spindly little arms were only slightly larger than the wire I was using to pin them. It would have been a shame to have held onto those bitz for over a decade, only to end up ruining them in the process of trying to stick the whole thing together.
I left his right side unattached while I was building him, since there was a fair number of little fiddly bits inside his cloak that I would never be able to paint once he was completely assembled. I got the hood courtesy of Cygnus, which I elongated to fit the Skaven aesthetic.
The scythe is actually from one of the ornamental bits on the Vampire Counts Coven Throne, which worked rather nicely. I did have to carve out a slot for it between his arm and his shoulder, but once I did, it fit nice and tight. His base is cobbled together from a couple of chunks of rubble from the Assault Marine sprue, along with some greenstuff brickwork and the obligatory skull.
The cloak on the Empire Wizard looked much to starched and smooth for a Skaven that's been crawling around in the rubble of Mordheim for months, so I carved in some rips and tears and sculpted a few more folds and wrinkles to break up the smoother areas. I actually hollowed out the entire bottom of the body so that the feet and legs would go up inside the robes, not that you can really tell on the finished model much.
All in all, I'm pretty satisfied with how this guy turned out. Definitely worth the twelve year wait. Now I just need to see if I can get another fifteen or so models finished in less than 180 years...
Monday, October 8, 2018
Gubbinz: Reinforced Ram
The first gubbinz that I started working on after our mini-campaign were also the last ones that I managed to finish. My reinforced ram, though fairly simple conceptually, ended up being much more difficult to pull off that I had expected. The idea was simple enough. I was going to start from a Chimera dozer blade and bulk it out with Orky bits until it looked less functional as a plow and more like something that was just used to smash into things. I was envisioning something like the Battlewagon ram, but a bit more boxy. Simple, right?
The first few steps went very smoothly. I glued the dozer blade to the trunnion and then carefully cut across the push frame where it would meet the undercarriage of the trakk. I then drilled out both sides and inserted some sturdy brass rod into the blade side. Since this would be sticking out in front of the trakk and could be relatively large compared to some of my other gubbinz, I wanted to make sure that it didn't snap off if it got caught on a piece of terrain or something. To make it secure, however, I couldn't just have a strong connection between the blade and the frame, I also had to have a strong bond between the push frame and the undercarriage of the trakk. While there are lots of bits under there that I could have potentially glued the ram to, there were no flat surfaces where I could get a good bond. Just lots of bolts and rods, all at different depths. I decided that the best move would be to gently clip away a bit of the detail to make some flat, level places where I could attach the ram...
...I didn't do such a great job. I ended up accidentally breaking the front axle of my trakk. Then, while trying to clean up that mess, I ended up breaking some other bits off the undercarriage.
By the time I got all the broken bits removed and everything smoothed off, the entire front of the trakk was gone up to the chassis. While this was pretty frustrating, it meant that I could make the new undercarriage solid.
The new axle assembly was built with two big plasticard I-beams on the bottom, which gave me a good surface to glue my ram to, even though they would run perpendicular to each other.
Unfortunately, I was never able to get all the bits of broken axle out of the resin wheels, so I just extended the axle wider and drilled new holes into the wheels to pin them with some brass rod. Despite my best efforts, I didn't drill the holes in the wheels very straight, so the wheels are now really crooked. On the other hand, I didn't assemble the rear treads very straight either (I'm really starting to dislike working with resin), so the vehicle has never really been able to sit flat, so I didn't worry too much about it.
Attaching the dozer blade to the new axle assembly went very smoothly.
The hard part would be attaching everything to the chassis. Even after chopping off all the little greebly bits, it still wasn't a perfectly level surface, so I leveled it off with some plasticard.
I actually drilled out four little holes in each side to try and pin the axle on, but trying to line up four tiny bits of wire proved to be way too difficult, so I just glued all the flat surfaces together and filled all the gaps with green stuff. I then glued more plasticard to the outside to reinforce the bond. I also made sure to paint the axle assembly before sticking it to the rest of the trakk, since there was no way I was going to be able to paint all those little crossbeams once they were attached.
So after two months of breaking things and trying to repair them, I had finally managed to get the Chimaera dozer blade attached to my trakk, which meant that it was finally time for the converting of the actual ram to begin.
The first step was bulking the ram up to a size that looked good on the trakk, which took a bit of trial and error, adding on plasticard and then cutting it back down. The next step was making it look proper orky.
I added a bunch of panels to look the finished ram look more cobbled together, then added some ork glyphs and some big toofy bits. I used a combination of plasticard and glass beads for the rivets, which was rather time consuming, but managed to tie the scratchbuilt bits to the dozer blade.
For the paint job, I decided that I'd first paint it up all bright, shiny and new, then weather the shit out of it to make it look like it'd been smashing through everything in the desert for months.
This meant painting a million thin coats of white over the black undercoat...
It wasn't the cleanest checkerboard pattern I've ever painted, but it was about to get beat to hell, so I didn't mind.
The finished paint job turned out pretty well. Lots of washes and thinned down brown paint. I painted the scratches to look like the ram scraped up a lot of sand and rocks between the teeth of the dozer blade. I think the finished effect turned out pretty decent.
So after two long years of work, my Morker Mob is finally finished. There are still a few things I'd like to go back to and fix, such as making the big gunz on all my vehicles interchangeable (and someone got the idea of making a bunch of bikes stuck in my head). For now though, I'm pretty happy with how Grizwoad and his mob have turned out, so it's time to move on to some other nerd projects.
Labels:
40K,
Conversions,
Gorkamorka,
Greens,
Gubbinz,
Halftrakk,
Orks,
Painted,
Ram,
Trakk
Friday, October 5, 2018
Gubbinz: Armour Plates
One thing about basing my big trakk off the Forgeworld Halftrakk is that its stripped down design didn't really give me many places to paint in my mob's colors. I went for sort of an old-school Goff scheme with Grizwoad and Da Chop Squad—black with white checks and a fair amount of red. Unfortunately, since so much of the model was exposed machinery and engine, the only parts of the trakk where you could really see the paint job was on the door panels on the back of the bed, and those got covered up later with my spiky gubbinz. When I decided to model some extra armour plates for my trakk, I decided that I wanted to built an entire hood to encase my engine. That way, I could have a bigger surface to do some Orky paintwork and if it happened to get blown off, you would get to see my spiffy engine bits again.
Since I imagine the extra armour plates as the mob's spanners just bolting any big hunk of metal they can find to the side of the vehicle, I wanted an appropriately eclectic assortment of materials. The main body of the hood is built from plasticard with bits from disposable razors and other random pieces of plastic that I had lying around. Instead of plasticard, I decided to try making my bolts out of tiny glass beads. It's a bit finicky and required drilling a lot of tiny holes, but the finished effect was pretty cool. I chopped up some of the panels from the standard Ork Trukk to serve represent taking a second and third armour plate and picked up a pair of the exhaust pipes from the Fighta-Bommer to make someplace for my exhaust to go, since the engine on the Halftrakk doesn't connect with the standard trukk exhaust pipe. I also built a supercharger for my engine out of the safety cap from a razor. This was mostly just to make it look cool, but I could also use this to represent the Meks making my trakk fasta if I wanted.
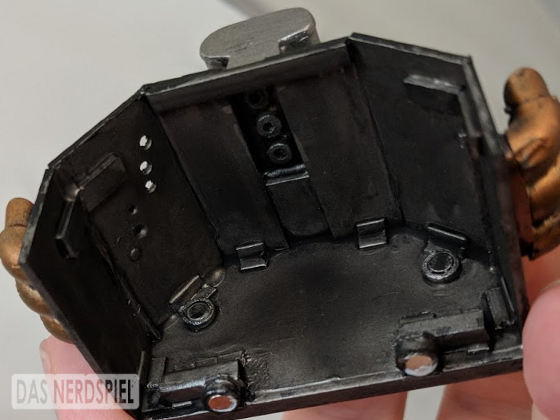
As with my spikes, the biggest engineering challenge was how to make it attach to the trakk. The hood had to go right over the engine, but I didn't want to just drill a big hole in the middle of it or glue a bunch of magnets to the side of it. However, since the intake pipes on the halftrakk engine are just three fairly uniform tubes that stick straight up, I decided to take a set of slightly smaller tubes to fit inside them, essentially balancing the hood on the top of the engine. It worked fairly well. my little tubes connecting the engine to my supercharger fit nicely and kept the hood from sliding, but it was still just sort of balancing on top, so it would rock and sway every time you moved it. Fortunately, this was right when I was experimenting with my plasticard-covered magnets, which worked amazingly. The hood now snaps into place with a satisfying click and doesn't budge. I also added two more magnets to hold on the other two armour plates when I'm using them. As you can see from the picture, I also drilled a few bullet holes to make it look like the armour plates had already seen some action.
I like how the finished hood turned out. Painting the checks was fun, as was trying to give the whole thing a bit of weathering. I probably could have done a bit more paint chipping, since this is the front of the trakk where all the dust and rocks are going to hit, but I was trying really hard not to go overboard. I decided to leave the supercharger looking shiny and polished, as if it were the one part of the vehicle that the spanner took extra care of.
It's interesting how the hood changes the overall silhouette of the trakk. It definitely makes it look a bit boxier, and even a bit front-heavy without all the other gubbinz attached. I also think that the panels in the front balance the colors out a bit, so all the detail isn't at the very back of the vehicle.
While I was at it, I also went back and touched up the paint job on the rest of the trakk, most noticeably painting the cables on the engine red instead of black, again, to break up the oily gunmetal that makes up most of the vehicle. You might also have noticed that the front of the trakk has been lifted. This is because of the last and most time consuming of my gubbinz for this campaign...
Labels:
40K,
Conversions,
Gorkamorka,
Greens,
Gubbinz,
Halftrakk,
Orks,
Painted,
Trakk
Monday, October 1, 2018
Gubbinz: Spikes
Like my shoutas, my spiky gubbinz were originally built toward the beginning of our first campaign. Although they turned out quite well, there were always a few things I didn't like about them. Most of it had to do with working with bamboo skewers. Super glue wouldn't hold them to the plasticard, so I ended up using hot glue, which was a pain to do neatly. The spikes themselves were also a bit rounded and smooth for Ork engineering. I envisioned them more as hunks of wothless scrap pounded into jagged shards, rather than uniformly milled metal cones.
Fortunately, I was able to find some plastic cocktail skewers that I was able to cut into various lengths and widths, making for more of the feel I was going for. I actually had to sand some of the edges down because they would occasionally break off sharp enough to actually cut you. Most importantly, they could be glued on with plastic cement, which meant that I didn't have to mess with hot glue and I wouldn't have to worry about them falling off in the middle of games anymore.
The other major change I wanted to make to my spikes was to magnetize them. At this point, most of my gubbinz had been magnetized and my spikes were one of the few bitz still rattling around loose. Due to their placement, however, installing magnets was kind of tricky. Whereas the magnets in my boarding planks and boosta rokkits were drilled straight into thick layers of plasticard, there were no places I could do the same on the trakk, especially around the cab. Without contact all the way around the magnet, the prospect of gluing neodymium magnets to plastic becomes pretty dicey. Cyanoacrylate glue has pretty low shearing strength and it also doesn't bond well to smooth surfaces. Neodymium magnets also come together with a lot of force, so magnets snapping together can easily shatter brittle connections.

My solution to the problem was to slice up plasticard tube and encase the magnets in a plastic sheath. This allowed me to then use plastic cement to glue the little magnetic tubes to other plastic components. I also put caps on one or both ends which could be used to glue them onto a parallel surface, or to put a buffer between two magnets so as to reduce the impact of them sticking together. Plasticard gave me the added bonus of a surface that I could write on to mark the polarity of the magnets so I didn't accidentally mount one backwards. I initially only made enough for my spikes, but I ended up doing the same for the magnets in most of my other gubbinz. By the time I finished building everything, I'd probably made at least two dozen of these things and I still have a few extras lying around for the next project.
Overall, I think the new spikes are a significant improvement over the old ones. I'll probably find a few other uses for those plastic skewers, as well.
Labels:
40K,
Conversions,
Gorkamorka,
Greens,
Gubbinz,
Halftrakk,
Orks,
Painted,
Trakk
Subscribe to:
Posts (Atom)