Sunday, November 22, 2020

Fort Construction: Ladders


Gorkamorka Ladders

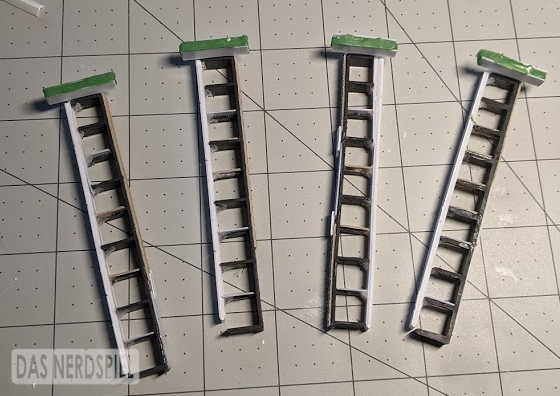
One important aspect of any fort (especially as far as the rules are concerned) is a way to get up onto the ramparts. In Gorkamorka, attackers can climb the walls from the outside, but ideally you'd want a way for your own boyz to get up there first. At one point I'd considered simply building ladders or stairs into some of the wall sections, but I decided it would be better to put the ladders where you need them, regardless of how your fort is put together.

Early wide ladders

The main structure of the ladders was built out of some aquarium parts that had a nice grid to them. I originally went with ladders that were two squares wide, but that made the ladders too wide for anyone but my Nob. Most military ladders tend to be thin and lightweight anyway, so I decided to err in that direction.

Ladder on a Gorkamorka Fort

Like most everything in the fort, I magnetized the ladders so that I don't have to worry about bumping them or having them tip over.  I could also use the magnetic couplings on my walls to attach other sorts of walkways, though I don't know what I would do unless I wanted a really long walkway crossing the entire fort for some reason. Maybe I'll think of something.

Wednesday, November 18, 2020

Fort Construction: Inner Walls


Gorkamorka Fort Inner Walls

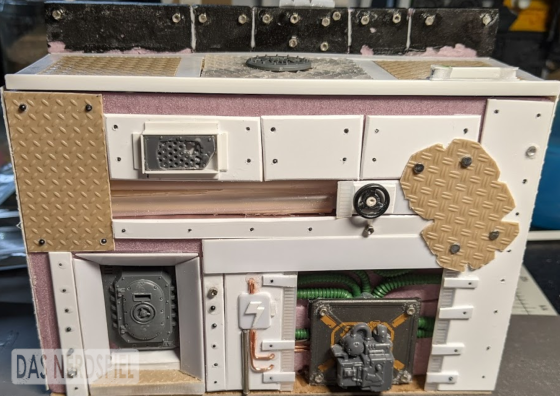
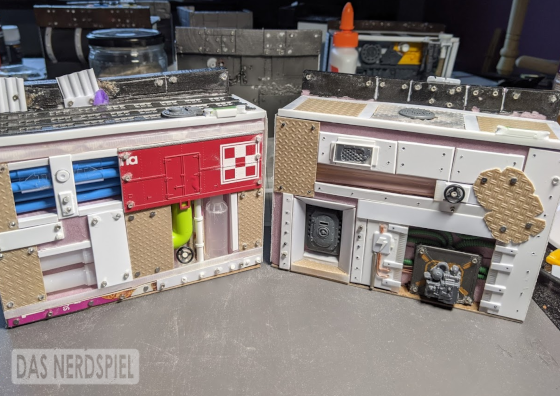
Making some good progress on detailing the inner walls of the fort.  Since this is where my gang's disproportionate number of Spanner Boyz hang out working on new gubbinz and making repairs to the mob's vehicles, it seemed like the fort would have to have some decent (if still somewhat ramshackle) electrical systems. Basically I imagine their fort to be a sprawling auto garage that has grown out of control.

Gorkamorka Fort Inner Wall

This section is just a bunch of pipes and conduits, with a convenient access hatch on the top. This piece also has the outside, so presumably all the waste from the generators and refineries (and, of course, the Orks) flows through these pipes before being unceremoniously dumped into the desert.

I used a pretty eclectic assortment of materials for this section, including a chunk of a model railroad car, a box of raisin bran, some drinking straws, and loads of plasticard. The rivets and bolts are mostly tiny hex nuts, though quite a few of them are actual nails I used to attach the bits to the underlying XPS foam structure. I also inadvertently melted a bit of the foam with super glue in a few places, which required some appropriately Orky repair jobs.

Gorkamorka Fort Electrical Systems

This piece was a bit more straightforward in its construction. It was mostly plasticard with some random bits from my bits box. Most of the rivets on this piece were tiny glass beads, which I'd previously used on my Big Trakk. These were a lot harder to work with than the bigger greeblies I used on the other section, so I kind of gave up on the beads after this.

Gorkamorka Fort Electrical Panels

I was especially pleased with how these big electrical panels turned out. Not bad for mostly scratchbuilding. 

Now I need to start working on some appropriate power tools to make this a proper chop shop.

Wednesday, November 11, 2020

Fort Construction: Da Chunk


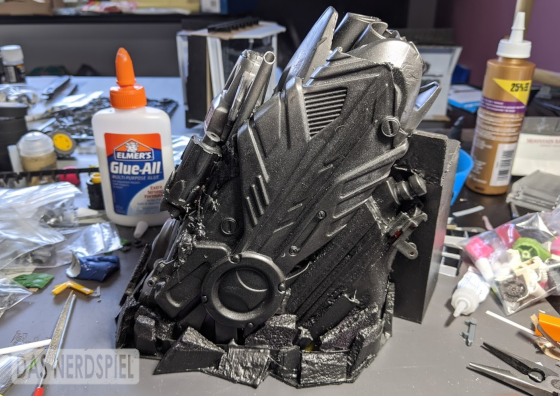
A portion of the fort wall consisting of spaceship wreckage

One of the main reasons that I decided to build my fort with modular walls (apart from much easier storage and transport) was so that I could swap out standard, straight sections with alternative ones. This meant I could make diagonal or curved walls, two-story towers, or whatever else I thought might be cool and Orky. For the basic fort, I had originally planned to have two kinds of special sections, both suited for my gang's fort at the far end of the Skid—one corner piece that jutted up against a large chunk of the 'Ulk and some sections where the walls of the fort butted up against solid rock walls. I ended up not having time to do the rocky outcroppings in this batch, so I focused my attention on the chunk.

The chunk is made from a large Nerf gun and a couple smaller water pistols I picked up at a thrift store. Apparently I completely forgot that I own a Dremel while I was building this thing, because most of the work was disassembling all the broken toys. 

There were some advantages to doing it the slow way. Taking out the screws on the Nerf gun and other toys with more complex mechanism allowed me to get at some of the sub-assemblies without damaging them. On the other hand, cheap water pistols made from hard plastic welded together are a huge pain. I mostly tore them apart with wire cutters, and they tended to shatter into sharp plastic shards. It made for some appropriately damaged wreckage, but probably wasn't worth all the stabbing I got during disassembly.


A crashed spaceship built out of broken water pistols.

There is a small foam wall section stuck to the back of the chunk so that it connects with the rest of the walls and models on the walkways can still pass by. There's also a bit of internal structure built out of plastic bottles to make sure that all the broken toys stay stuck together. I filled this interior structure with expanding foam, so everything is pretty solid at this point.

A crashed spaceship built out of broken toy guns.

I filed a few grooves into some of the more pristine bits of Nerf gun to make it look appropriately worn and damaged. I also filled some of the small holes in the construction with some dangling green stuff cables. It looks pretty decent with just a basecoat, so hopefully it will look even more like a huge chunk of space debris once it gets a proper paint job.

Sunday, November 1, 2020

Fort Construction: Outer Walls


WIP shot of the outer walls of a Gorkamorka Fort

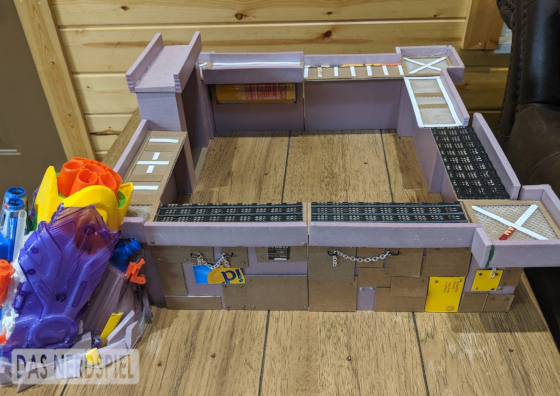
Work continues on the fort for my Morker boyz. Yesterday I spent some time working on the outer walls of the fort. The fort walls are made out of flame pro-tardant polymascotfoamalate with medium-weight chipboard used for cladding and armor panels. Chipboard works well in this case because many glues will melt foamulon, which can make it difficult to add details to the surface. PVA glue is still safe, though, and chipboard sucks up PVA really well, making a pretty decent bond. Chipboard also has a lot of downsides, such as warping when it gets wet and leaving soft, frayed edges when you cut it. I ended up transitioning to using mostly plasticard as the project went on and even went back and replaced a bunch of the chipboard in some places. Smooth plasticard surfaces don't bond quite as well with PVA, though, so I had to stick it on with two-part epoxy in some places, which was a lot more work.

Weights in the base of the fort walls

Since the walls were a bit top-heavy to begin with and would have fragile and relatively heavy miniatures balanced on top of them, I stuck some lead fishing weights in the base of each wall section to keep them from tipping over.

One of the criticisms I got about my walls early on is that despite the abundance of chains in much of the Gorkamorka artwork, having chains on my fort made it look more like a Slaaneshi dungeon than an ork fort. Naturally, I immediately reconsidered this aesthetic choice and instead...just kidding. I added even more chains.

Gorkamorka Fort Outer Walls

Gorkamorka Fort Outer Walls

Gorkamorka Fort Outer Walls

My general goal was to make it look a bit like the remnants of old machinery that broke down and was just kind of left in place. I might add some dangling cables or broken rails as well. Still, it's coming along slowly.

Thursday, October 29, 2020

Building Da Fort

Unpainted fort build out of XPS foam and chipboard

It's been a few months since I posted anything here, due to the fact that my town has been hit not just by the global plague that is currently rampaging largely unhindered through my country, but also by earthquakes, food shortages, and whatever the desert equivalent of a class 3 hurricane is. Fortunately, we're still alive and doing pretty well, all things considered. And although I haven't had a ton of free time between work, repairing the house after disasters, and staring blankly into the void, I have made some progress on a proper fort for my Morker boyz.

I actually started this fort over a year ago and the planning began long before that. Since my gang was the most obsessed with vehicles and gubbinz of any in our campaign, I wanted them to be based out of a remote fort on the far side of the Skid, where the the grots are unruly and the spanner boyz are even more eccentric than usual. I designed their fort to be built up against the side of an especially large chunk of the 'Ulk that had long since been stripped of any useful scrap. I also wanted to make the fort modular so that the other gangs could use the parts and swap in their own sections to make their own custom forts.

Schematics for Da Fort

Like most of the gubbinz for my big trakk, my plan was to hold everything together with magnets. Since there were going to be models standing on top of the walls, I wanted to make sure that the whole thing didn't tip over if someone bumped the table. It also had to fit the dimensions for the fort scenarios and be tall enough that all the vehicles in the campaign could fit through the gate. Fortunately, my mob has the most ridiculously tall vehicles in the campaign, so hopefully this will accommodate everyone.

Unpainted fort build out of XPS foam and chipboard

The project has changed quite a bit as the build has progressed, and there's still quite a way to go until it's ready to go on the table, but I'm pretty happy about the direction in which things are going.

Monday, March 23, 2020

All the Henchmen


I finally managed to get the last of my Verminkin finished up.  This last guy is armed with a push knife and a throwing knife.  Of course, only Heroes get to use throwing knives in Mordheim, so it will just count as a sling.  It was considerably easier to convert than the slings were, so I might make do this again when I need more Verminkin (which hopefully won't be for a while.

A converted Skaven Verminkin with Throwing Knife and Push Dagger for Mordheim

A converted Skaven Verminkin with Throwing Knife and Push Dagger for Mordheim

The idea for this guy came from the original Mordheim night runners, which featured a number of arms holding throwing knives and shuriken.

A WIP shot of a converted Skaven Verminkin with Throwing Knife and Push Dagger for Mordheim

A WIP shot of a converted Skaven Verminkin with Throwing Knife and Push Dagger for Mordheim

A WIP shot of a converted Skaven Verminkin with Throwing Knife and Push Dagger for Mordheim

As I recall, the knife is a Space Marine knife that I just whittled down to the proper size.  The blades on the push knife are from a Dark Eldar spear of some sort, as I recall.  It's surprisingly hard to find good symmetrical blades in Warhammer, but this one worked quite nicely.  As with my other Verminkin, the body is just a Clanrat with a green stuff cloak.

Converted Skaven Verminkin for a Mordheim Eshin Warband

So at long last, my Verminkin are complete, which should give me enough models for a decent starting warband.  Now I just need to work on some Terrain and we'll be ready to go.

A converted Skaven Eshin Warband for Mordheim

Sunday, March 15, 2020

Almost There...

A converted Skaven Verminkin with two swords

Here's another Verminkin for the horde.  I tried just giving this one two swords, though doing so with the Clanrat shield arm made for a pretty awkward pose.

A converted Skaven Verminkin with two swords

Yeah, punch daggers definitely work better than full on swords.

A WIP shot of a converted Skaven Verminkin with two swords

A WIP shot of a converted Skaven Verminkin with two swords

One more to go...